Friday, 28 September 2018

Trays for treasures activity


Trays for treasures

 make your own box for bits, 

for wonders and curiosities


Following up our Cabinets workshops (make your own, here, and see some examples, here), here is an easy way of making your own open-topped boxes to go in a Cabinet of Curiosity (or any other place that needs them!)

What you will need:
  • A piece of card – our examples are done with old Christmas cards
  • Ruler
  • Pen
  • Scissors
  • Glue (PVA is better than glue stick here)
  • Paper clips or maybe a stapler


1. If you are using a greetings card, cut your card in half along the fold

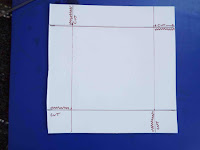
2. Measure and mark  3 cm from each corner on each side. Join these up so you have a smaller shape within the main card. Our cards were square – it does not matter what shape you start with (squares and rectangles are easiest!). 


3. Cut along along every other line from the edge of the card to the edge of the new box


4. Fold along the lines, folding the sides up to make a box. The cut sections will stick out. – a ruler may help but greetings cards often fold readily into straight lines


5. Use the cut to fold a short tab and tuck this either inside the new box or fold it round the outside. Either way this reinforces the corners. Glue or staple (or do both) to hold the tab in place. If you glue your tab, a paperclip can hold it in place while the glue dries


6. If you use greetings cards, you could fold them so that the picture forms either the inside or outside of the box
inside or outside?


More boxes: change the initial measure to make deeper boxes
  
This is a blog to support activities that are part of the BM125 project celebrating Buxton Museum and Art Gallery's 125th Birthday. You can find out more about the project here


Friday, 21 September 2018

Limestone and mermaids


Talking Stones!

richly fossiliferous limestone

Derwent Stories and BM125 at Altitude 2018


First there were rocks. And some lovely stones. And fossils. Chalk and limestone, granite and gabbro. Rocks to hold and think about. Trilobites, goniatites, crinoids and teeth.  We hoped these would feed into lovely puppet and word activities inspiring quiet conversation around mineral stories and the arguments of crystals.

Then it rained.

The Altitude Youth Arts Festival at the Mt Cook AdventureCentre where we were working was a lovely afternoon. There was some excellent music to keep us entertained. Songs from young musicians, dance from another young group, some quiet storytelling from others. There was a cap fire in the woods and bushcraft activities to try. And us making pebble puppets on a field while people sailed, shrikeining, down a zip wire overhead.

great fun - and he seems happy!
Great fun!

Our carefully planned activity dissolved a bit in the rain but we made some wonderful puppets all the same. We got people holding rocks. Talking about what they might find in their gardens at home or out on a walk. And they went home with some wonderfully crazy little characters….

Make your own pebble puppet: instructions will follow shortly

BM125: setting out to take the Buxton museum and Art Gallery . Follow the link above to find out more about BM125
collections out into the Peak District landscapes as part of the celebrations for the Museum's 125th birthday, Altitude gave us the chance to talk to people, show them rocks from local places, comapre these with not so local rocks, take that rocks and fossil knowledge and build characters inspired by that knowledge


For all our DS events, we post a "where did we go" note with advice and experience that might help people decide if they would like to go themselves on another occasion

Visiting Altitude
When: Altitude is a Youth Arts Festival within the bigger Wirksworth Festival. As such it happens once a year - watch for dates for next September
Access: activities happen at different sites. Mt Cook Adventure Centre has parking, easy access for wheelchairs and good toilets. Activities were free. The music was great. On a good day it would have been a lovely afternoon to sit on the grass with a picnic, do a bit of making, enjoy the music, and generally relax. At the Eco Centre next door there was more acoustic music
Useful links


Thursday, 20 September 2018

A museum in a box activity


"A box for sea glass from wide, windy beach"


Make your own Cabinet of Curiosity


would you keep our mermaid in a cupboard?
In Victorian times a Cabinet of Curiosity might have had drawers and more drawers, shelves and secret compartments. It might be small but probably large. It might be a glass fronted cabinet full of dried butterflies or stuffed birds. It might be a beautiful case for your preserved mermaid. The Collectors and Curiosities: Buxton and beyond exhibition at Buxton Museum and Art Gallery (runs to 6th October, follow link for details) is full of small treasures and larger curiosities

At the Museum, and other places, I do a lot of Cabinets workshops. Most recently, as part of our BM125 celebrations we had a lively afternoon with 80 visitors making nearly 40 Cabinets between them. Follow the links below to find some of the Cabinets we made and the poems that grew out of our excitements. You do not need to wait for another event – try making your own cabinet, a portable museum for your own home, a treasure chest for summer finds…

Examples of our Cabinets are here
Our Cabinets poem can be heard here

Making a cabinet at home could be as simple as filling a cupboard with treasures (do check with someone vaguely responsible before tipping plates all over the floor). I like making my own so here is a guide to making your own Museum Box for small delights and strangenesses

You will need:
·      a cardboard box – with a hinged lid or a loose one
·      a cutting mat
·      a craft knife
·      ruler
·      felt pen
·      colourful magazine
·      scissors
·      glue: you could use a glue stick but white glue/PVA is stronger
·      paintbrush for PVA
·      a small sheet of acetate: clear plastic film: hunt around, maybe a file cover from a stationery shop, maybe a window from some other box
·      small boxes (see stage….)

1. Have a look at your box and draw a window in the lid: rectangular, oval, wobbly, as long as it is not bigger than your piece of acetate. Cut out the window: use a craft knife on a cutting mat and BE CAREFUL!


2. Decorate your box: we usually use magazine pictures but have done lovely Cabinets with old maps, wrapping paper..whatever takes our fancy. Neat cutting? Rough tearing? What do you prefer?


3. Inside the box as well? Just make sure you don’t glue the box shut by mistake?


4. All done? Add your small boxes…we often do this activity with large groups of people so use small carboard museum trays used for tiny specimens. Rummage around your house and see what you can find. Matchboxes? Packing box? A box jewellery came in? Tiny tins for spice or tea. Origami? Make your own: easy to do. A quick suggestion will follow in the next blog

5. Add the boxes to your Cabinet? Do you want to glue them down – make sure the main Cabinet can still close. Keep them loose?

6. Fit the plastic window to its space: glue or sticky tape the sheet into place on the inside of the lid


Add some treasures! Treasures might not all fit in your small boxes: there might be bags or bundles as well. You might make a miniature guidebook


Next BM125 public event: we’ll be at Apple Day at the Dove Valley Centre on Sunday 14th October. Detals will follow on this blog and on the Creeping Toad facebook page Here we will be celebrating the heritage of orchards and old fruit varieties – a reminder that museums hold memories as much as objects and those objects belonged to lives lived in our wider landscapes. Join us and make your own apple-puppet to tell your own orchard stories