Build a castle, build a tower, build a landscape
where adventures might happen….
Make your own medieval world: a castle, a cathedral, a palace, the lost houses of your town? Mixing history with stories, invent a world of strange and wonderful places; with towers and drawbridges, secret passages and hidden treasures, moat, dungeon, dragon or despair. Let your medieval imagination get carried away and make a pop-up castle to take home.
This is an online event for the Festival of Archaeology. It is also a Celebration:Earth! event, reminding us that the world we live in now has grown
out of centuries of stories and adventures. There is a short film of this activity on the Buxton Museum and Art Gallery page if you'd like to watch rather than read
Do some research first? Have a look at pictures of castles or palaces or whatever it is you would like to make! Find out about their features and use that information. Look at the shapes of windows and doors, craving son walls, statues. Could you show where an oubliette has been forgotten? Where a garderobe disgorges? Can you sneak in a sally-port
We’ll describe this activity as if we’re making a medieval castle. You could take the same idea and make a Roman fort or a beautiful church, a palace or a witch’s exciting house
Now, flex those imagination muscles, exercise your scissor fingers and your colouring thumbs and join us to build a castle, build a tower, build a landscape where adventures might happen….
You will need
· A piece of cardboard: white A4 or A3 is best but this activity will work with cereal packet card as well or anything that you can cut and roll without it cracking
· A piece of stiff card as a base
· Scissors
· Ruler
· Felt pens or colouring pencils
· Sharp scissors
· Small ball of modelling clay
· PVA glue
· Masking tape
· Craft knife and cutting mat
· A magazine with pictures to cut out, or tissue paper or wrapping paper
· Barbecue skewers (one for each puppet character you want)
Picture: Low storycastles 1
Step 1. Getting ready
Use the ruler to draw a line maybe 2cm in from one of the long sides of the card (line 1). Take the rule in another 3 or 4 cm and draw another line (Line 2)
Step 2. Drawing the castle
Above Line 2 draw your castle: think of it as a castle unfolded so work your way right across the card. There might be towers and battlements, and another tower, and a hole made by a cannonball. There might be arched windows, a door, arrow slits. Use Line 2 as a guide and don’t draw the top of your building further down than that line. If you do, you might weaken the whole castle. Don’t draw below line 1 – that will be used for something else
Step 3. Cutting out and colouring
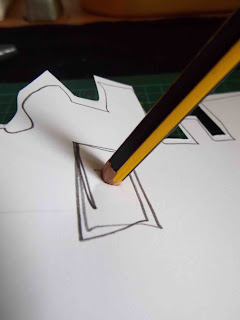
Cut out the castle. Cutting out windows: you might recruit a grown up with a craft knife and a cutting mat, or if you sit your castle shape so the window you want to cut out is on top of that lump of modelling clay, you can safely push the pencil through the card and into the clay. Give the pencil a wiggle. This should give you a big enough hole to slide some small scissors in and then you can cut out the window yourself.
Colour the castle in: completely? Or just draw in stones and ivy and decoration? Up to you!
All done? No! add a little bit more! How about some glitter?
Step 4: all decorated and looking wonderful?
Now cut tabs along the lower edge of the castle, cutting up to Line 1. Do your cuts about 2 cm apart
Run some glue along one side of the castle, then roll the other side round so they just overlap. Carefully press into place. Maybe use a bit of masking tape to hold it together while the glue dries or staple it if you have a staple. Carefully, fold the tabs out so that your castle will stand on the table with its tabs spread out like little feet
Step 5. Stand that castle up!
Turn your castle upside down and put a small squidge of glue on each tab. Gently stand on the castle on the tough card. You might need to adjust things a bit so that it stands straight and proud. Then press the tabs down. More masking tape will hold them in place while the glue dries. Now, rather than having a castle standing in a muddy cardboard square, decorate the castle surround with scrap paper or torn up magazine pictures or whatever (we sometimes use green sponges for bushes, grey ones for stone). There might need to be a paper moat) draw your own crocodiles or piranha perhaps). Step back and admire! You have a castle!
Characters
Having a castle means you might need a story to tell. Use some of your left-over card (or find some more) to draw someone to send on an adventure. Stick them onto a barbecue skewer (if it is very sharp, you could snip the point off with a pair of scissors so it is less likely to stick in someone!)
Extra elements: if you started with a larger piece of card you could use that to make the outer wall of you castle while a smaller piece of card could be used to make a keep inside the courtyard of the larger piece. Experiment: can you add a drawbridge?
We made an adventurous explorer.
We added a dragon. There might be treasure?
If you want some help with
characters, there is a pdf attached that you should be able to print out of
explorer children and some castle people. Castle characters sheet


